Courtesy: http://www.computerfreetips.com/Cisco-Call-Manager-CUCM/Cisco-CUCM8-install-vmware.html
Cisco Unified Communications Manager Version 8.0
Follow the given points to install CUCM 8 in vmware step by step.
Step-1
Turn off your Window's Firewall and set a static IP in your Loopback Adapter.

Step-2
Configure a NTP Server in GNS and connect with VMware through Cloud.

Step-3 (a)
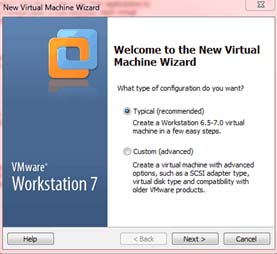
Now Configure VMware with these settings. Select Typical option.
Step-3 (b)
If you have CUCM-8.0 IOS in DVD then select Installer disc option, If you have CUCM-8.0 IOS in your hard disk or flash drive then select Installer disc image file (ios). Do not select option I will install the operating system later.

Step-3 (c)
Provide information like Name, User name, Password as you wish.
Step-3 (d)
Provide Virtual machine name e.g (CUCM 8) and Browse the location where you want to save the CUCM 8 files.

Step-3 (e)
Allocate hard disk size, Minimumm size of hard disk for CUCM 8 is 72 GB and select option Store virtual disk as a single file.

Step-3 (f)
Allocate Memory more than 2GB to run CUCM 8 properly and also configure Network Adapter as a Bridged.
After step-3 virtual machine settings are complete. Power On this Virtual machine (CUCM 8).

Step-4 (a)
If you want to check your media resources (e.g hard disk, RAM etc) then select Yes, but if don't select No. This media check is Optional.

Step-4 (b)
Cisco Unity Connection and CUCM Business Edition are not supported on current hardware.

Step-4 (c)
Select Yes for further installation.

Step-4 (d)
Select Proceed for further installation.

Step-4 (e)
If you have any Upgrade patch regarding CUCM 8.0 then select Yes otherwise select No.

Step-4 (f)
Select Continue for further installation.

Step-4 (g)
Select your Timezone and select Yes for further installation.
Step-4 (i)
If you want to change MTU size then select Yes, if don' select Nom, then next step If you want DHCP on this machine select Yes, if you don' select.

Step-4 (k)
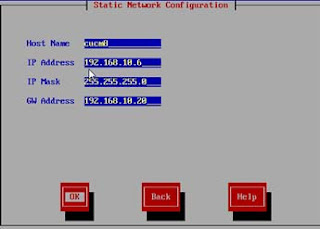
Provide Network configuration.
Step-4 (l)
If you want to enable DNS client on this machine select Yes otherwise No.
Step-4 (m)
Provide Administrator Login Configuration.

Step-4 (n)
Provide Certificate Information. This option about your organization information.
Step-4 (o)
Select Yes if this CUCM is Publisher. Select No if you have already a Publisher.

Step-4 (p)
Provide NTP server's IP address as provided in step-2.

Step-4 (q)
Provide Security Password. This password is used in Clustering.

Step-4 (r)
If you want to configure SMTP select Yes but if you don't select No. Now Provide Application User Configuration.

Step-4 (t)
Select Ok if you provide correct information. Select Back if you want to change anything.

Cisco Unified Communications Manager Version 8.0
Follow the given points to install CUCM 8 in vmware step by step.
Step-1
Turn off your Window's Firewall and set a static IP in your Loopback Adapter.
Step-2
Configure a NTP Server in GNS and connect with VMware through Cloud.

Step-3 (a)
Now Configure VMware with these settings. Select Typical option.
Step-3 (b)
If you have CUCM-8.0 IOS in DVD then select Installer disc option, If you have CUCM-8.0 IOS in your hard disk or flash drive then select Installer disc image file (ios). Do not select option I will install the operating system later.

Step-3 (c)
Provide information like Name, User name, Password as you wish.
Step-3 (d)
Provide Virtual machine name e.g (CUCM 8) and Browse the location where you want to save the CUCM 8 files.

Step-3 (e)
Allocate hard disk size, Minimumm size of hard disk for CUCM 8 is 72 GB and select option Store virtual disk as a single file.
Step-3 (f)
Allocate Memory more than 2GB to run CUCM 8 properly and also configure Network Adapter as a Bridged.
After step-3 virtual machine settings are complete. Power On this Virtual machine (CUCM 8).

Step-4 (a)
If you want to check your media resources (e.g hard disk, RAM etc) then select Yes, but if don't select No. This media check is Optional.
Step-4 (b)
Cisco Unity Connection and CUCM Business Edition are not supported on current hardware.
Step-4 (c)
Select Yes for further installation.
Step-4 (d)
Select Proceed for further installation.
Step-4 (e)
If you have any Upgrade patch regarding CUCM 8.0 then select Yes otherwise select No.
Step-4 (f)
Select Continue for further installation.
Step-4 (g)
Select your Timezone and select Yes for further installation.
Step-4 (i)
If you want to change MTU size then select Yes, if don' select Nom, then next step If you want DHCP on this machine select Yes, if you don' select.
Step-4 (k)
Provide Network configuration.

Step-4 (l)
If you want to enable DNS client on this machine select Yes otherwise No.
Step-4 (m)
Provide Administrator Login Configuration.

Step-4 (n)
Provide Certificate Information. This option about your organization information.
Step-4 (o)
Select Yes if this CUCM is Publisher. Select No if you have already a Publisher.
Step-4 (p)
Provide NTP server's IP address as provided in step-2.

Step-4 (q)
Provide Security Password. This password is used in Clustering.
Step-4 (r)
If you want to configure SMTP select Yes but if you don't select No. Now Provide Application User Configuration.

Step-4 (t)
Select Ok if you provide correct information. Select Back if you want to change anything.

badiya
ReplyDeleteGood one !
ReplyDelete